25.4.16

ALMOND MARMALADE CAKE


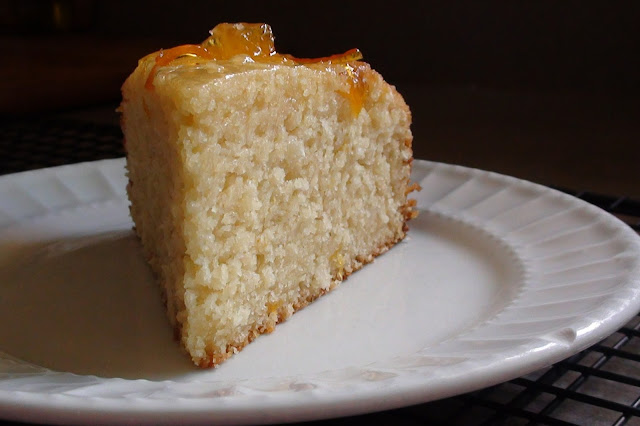
One more for our afternoon tea and this one is my concoction. I made a pot of marmalade last week, ran out of time and there it sits in a bowl in my fridge. Here come the marmalade recipes. The marmalade I made is pectin free with long strands of orange zest. The stands almost all incorporated into the cake. With a thicker jam, you may have to increase the juice or decrease the semolina. The batter I made was on the runny side. I thought the semolina will grow in the oven and sure enough, it did. It turned out to be a stable cake with a great crumb. 


Almond Marmalade Cake

2/3 cup oil
1/2 cup orange marmalade
1/3 cup sugar
4 eggs
1 cup flour
2 tsp baking powder
zest of 1 orange
3/4 cup semolina
1-1/4 cup almond meal [very finely ground almonds]
3/4 cup fine unsweetened coconut
1 cup pure orange juice
1/4 cup orange marmalade for topping


  • Preheat oven to 375F.
  • In a large bowl, whisk together the oil, marmalade, sugar and eggs to combine.
  • In a separate bowl, whisk together the, flour, baking powder and the zest of 1 orange.
  • Add the semolina, almond meal and the coconut. Whisk to combine.
  • Add to the egg mixture alternatively with the orange juice and just mix to combine.
  • Fully line a 9-inch spring-form cake pan with parchment paper.
  • Pour the batter into the pan and bake for 45 to 50 minutes or until knife inserted comes out clear.
  • Take it out and poke the top with a sharp knife half a dozen times.
  • Pour 1/4 cup of marmalade on the top while warm.
  • Serve still warm with whipped cream.
  • The texture however relaxes and the flavours fully blend by the following day.

24.4.16

CARAMEL WALNUT BARS


Lovely caramel bars, not overly sweet, they are just right. With every bar cookie, the same standard applies, for neatly sliced bar cookies, chill before removing the entire bar from the baking pan before you slice. Parchment paper not only saves time scrubbing the baking pan, the overhangs make it easy to remove the bar intact. I didn’t chill these, I wasn’t preparing them for company, I waited until the bar cooled down to room temperature. I had a hard time melting the caramels, I bought them last December for a Christmas cookie that never happened and by now, they were rock hard. I think if I melted them in a double boiler it would have been an easier task.

Caramel Walnut Bars

2 cups flour
3/4 cup brown sugar
1 egg, beaten
1/2 + 1/4 cup cold butter
3/4 cup walnuts, chopped
24 caramels 
1 can sweetened condensed milk [not light]


  • Preheat oven to 350 degrees F.
  • Line a 13 x 9-inch baking pan with parchment paper, leaving overhangs [for easy grasping] on the long sides of the pan.
  • Place the flour and the brown sugar in a large mixing bowl and whisk.
  • Rub 1/2 cup of cold butter into the flour mixture by hand or pulse it in the food processor a few times until the mixture resembles fine crumbs.
  • Add the egg and mix it into the crumb mixture throughout.
  • Add the walnuts and mix to combine.
  • Take out 2 cups from the crumb mixture and set it aside for later use.
  • Press the remaining crumb mixture into the bottom of the prepared baking pan.
  • Bake in the preheated oven for 15 minutes.
  • Meanwhile remove the wrappers from the caramels.
  • In a heavy saucepan, over low heat, or in the top of a double boiler melt the caramels with the sweetened condensed milk and the remaining 1/4 cup of butter.
  • Pour the caramel mixture over the prepared crust.
  • Top the caramel layer with the reserved crumb mixture.
  • Bake the bar for 20 minutes or until bubbly.
  • Cool and cut into bars.

22.4.16

USING UP FRUIT

Every day is Earth Day! It is now springtime in Kamloops and the trees surrounding our home are laden with tiny fruits. Summer’s bounty is not far away but for now, we are still buying fresh fruit from California. Fresh fruit is not cheap. With Jim being a fresh fruit addict and Olivia’s limited inclination to eat vegetables we always have a variety of fresh fruits on hand and invariably not all is consumed. Using up overripe bananas is a no brainer. You make banana loaf or muffins. But other fruits are a little more problematic. Particularly if you don’t have much to begin with. All of these are quick fixes for the smallest amount of fruits that passed their prime.

The end is never as glorious as the beginning of a pineapple. I cannot eat uncooked pineapple so we would feed the last bits to the composter. Then I started to make it into jam and now I look forward to the over ripening of each pineapple. Pineapple jam is easy to make and is one of the nicest of jams. I use no pectin and little sugar. The forgotten apples went wrinkled in the fridge, but they are not enough to make a pie. The cantaloupe was not ripe enough, but on its own would be watery. The wrinkled apples will give it bulk. We will have it with the pork roast on Sunday. Then there are the out of season strawberries some of them are soft and half of them are still green. They will make strawberry butter for breakfast tomorrow. 

Do you have fruit too ripe to eat? Don't throw it away. Add a little sugar and lemon juice and give it a second life. If the fruit is growing fuzzy things or already brown, compost it. But just because a fruit is no longer enjoyable to bite into, it can still give the enjoyment of flavour, even the picked over half green strawberries. None of these recipes meant to be preserves. The intent is to use up small amounts of fruit rather than tossing them.  

USING UP FRUIT
Pineapple Jam

Make Jam:
1 cup pureed fruit
1/2 cup sugar
lemon juice to taste

  • Place pureed fruit in a deep, heavy pan.
  • Add the sugar.
  • Add lemon juice for taste.
  • Slow simmer until the jam begins to splatter.
  • With continuous stirring, cook for 4 minutes longer.
  • Take the pot off the heat, and leave it for a few minutes.
  • Pour the jam into a sterilized jar or container and store it in the fridge.

Cantaloupe Apple Sauce

Make Fruit Sauce:
1 cup crushed fruit
sugar and lemon juice to taste
1 Tbsp butter

  • Place the crushed fruit in a sauté pan.
  • Add sugar and lemon juice to taste.
  • Add 1 Tbsp butter.
  • Slow simmer until the sauce thickens.
  • If not using right of way pour into a sterilized jar and refrigerate.
  • Use over pancakes, ice cream, roasted meats or coffee cakes.

Strawberry Butter

Make Fruit Butter:
1 cups crushed fruit
1/2 cup sugar
2 Tbsp lemon juice 
1 Tbsp butter 

  • Put the crushed fruit in a deep, heavy pan, with the sugar, lemon juice and butter.
  • Gently simmer until it starts to splatter.
  • Cook stirring for 4 more minutes.
  • Take the pot off the heat, and leave it for a few minutes.
  • Pour the fruit butter into a sterilized jar or container and store it in the fridge.

21.4.16

TINY SALTY TEA BISCUITS - SÓS APRÓ TEASÜTEMÉNY

Before potato chips burst onto the market these tasty morsels used to be the quintessential appetizers at large gatherings, home parties and even at modest wedding banquets at restaurants. Much like mine was many years ago in Budapest, with close family at a good, but not overly posh restaurant.

Coffee houses used to sell them by the kilo, they were good and reasonably priced. Nobody I knew would even think of making them. It might be different now; the last time I visited the old country was back in 1990. 

These are extremely simple to make and they last well... if they last. It is best to make the dough in a stand mixer, avoid touching the dough by hand. I didn’t get too fancy with the shaping, but you can cut rounds, half moons and triangles. The topping can vary: different types of seeds, caraway and poppy or various types of grated cheese will give them an entirely different flavour. 

TINY SALTY TEA BISCUITS
3/4 cup butter
2 cups flour
1 tsp instant yeast
2 egg yolks
1/2 tsp salt
1/4 cup sour cream + 1 Tbsp
1 egg for brushing, lightly beaten
1/8 cup sesame seeds
1/4 cup grated parmesan

  • Combine the butter with flour and yeast in a stand mixer.
  • Don’t whip, knead or over mix. Make sure the beater is on slow speed at all times.
  • Add the egg yolks, sour cream and the salt and stir to combine.
  • On lightly floured cutting board, roll the dough into a ball.
  • Press down and shape into a square about the thickness of your fingers.
  • Brush with egg and place in the freezer for 10 minutes. Dough should be stiff but not fully frozen.
  • Meanwhile turn the oven to 450F and line a rimless cookie sheet with parchment paper.
  • Remove the stiff dough and place it onto the prepared cookie sheet.
  • Divide the dough in two parts for two types of toppings. I used sesame seeds and grated parmesan.
  • Again, brush with egg yolk and douse the tops with the toppings. 
  • Shake off the excess toppings and with a sharp chef’s knife cut into squares or rods or any other shape desired. The most economical shapes are squares and rods.
  • Separate the biscuits leaving a little room for expansion.
  • Bake the biscuits in the preheated oven for 15 minutes or until the tops are golden.
Note: the original recipe called for an inordinate amount of salt, I reduced it by half and still I found the biscuits too salty. The second time I only used 3/4 tsp and it was perfect.

There are endless recipes of salty tea biscuits, the following video shows the process really well.


POACHING SOCKEYE with VEGETABLES AND STOCK

When the love of your life want to feed you fish and doggedly insist on it you have to give in a little... sometimes. But I found a way to make the dreaded brain food in a shortest possible way and at the same time surprisingly enjoyable. I concluded that the only fish I will enjoy is wild Pacific sockeye or freshly caught lake trout. I used to love fresh halibut, but those are hard to come by. Sockeye is more expensive and less available than spring so right off the bat avoiding my bargain hunter over-fishing for said brain food. I have been poaching fish in vegetables, stock and a bit of wine lately and so I feel this has earned a space among my recipes. My neuronal filaments should be in good shape henceforth.


POACHING SOCKEYE with VEGETABLES AND STOCK
2 filets of wild Pacific sockeye salmon
sprinkling of salt
2 Tbsp olive oil
1 carrot
1 parsnip
small wedge of onion
1-1/2 cups chicken or pork stock
2 splashes of white wine [optional]
freshly ground pepper

  • Wash, dab dry the salmon filets and lightly sprinkle with salt.
  • Let them sit on the counter from 20 minutes to about an hour.
  • Dice the carrot, parsnip and a small wedge of onion.
  • Heat a non-stick skillet on medium.
  • Add 2 Tbsp olive oil and the diced vegetables.
  • Sauté until the vegetables are vibrant in colour.
  • Add 1-1/2 cups of chicken stock and slowly simmer until the vegetables are tender.
  • Add a couple of splashes of white wine and slide in the salmon fillets.
  • Bring back to simmer and slow cook the filets for 1 minute.
  • Gently turn them over, reduce heat a little and cover with a lid.
  • Slow cook the salmon for 4-5 minutes.
  • Remove from heat and let it rest for two minutes before serving.  
  • Time varies depending on the number of filets.
  • The salmon was pre-salted, the stock is salty, the only seasoning I would add is freshly ground pepper. 

18.4.16

COCOA SNAILS WITH LAMINATED YEAST PASTRY – KAKAÓSCSIGA BLUNDELL TÉSZTÁVAL


Home cooks always made it from plain yeast dough, but cocoa snails served at Hungarian coffee houses were typically made from a combination dough called blundell pastry. It has the characteristics of both laminated and yeast doughs. The only filling that will work here is a mixture of bitter cocoa and granulated sugar.  

COCOA SNAILS WITH LAMINATED YEAST PASTRY 
flour for rolling 
Cocoa Filling: 
1/3 cup bitter cocoa - Don't substitute the cocoa. Chocolate or ganache will not work. 
2/3 cup sugar 
1/4 cup melted butter - Use the suggested amount of melted butter so the sugar can melt into the cocoa. 
 
  • When the dough is ready for shaping, line two large baking sheets with parchment paper.
  • Take out the dough and roll it into a 1 cm thick rectangle. Mine measured 26X16 inches, and I got 26 snails from it. 
  • Melt 1/4 cup of butter. 
  • Brush the top of the rectangle generously with melted butter.
  • In a small bowl, combine the cocoa and the sugar.
  • Pour it onto the buttered rectangle and spread out the cocoa mix evenly from end to end.
  • Take the remaining melted butter and using the pastry brush sprinkle it over the cocoa layer.
  • Starting at the long end nearest to you, roll up the dough into a log. Don’t roll it too tight or too loose.
  • Sprinkle the top with flour. This will make it easier to slice the dough.
  • Cut the log into 1/2 inch thick wheels.
  • Place the wheels with the ends tucked under on the prepared baking sheets. Leave some space for expansion.
  • Let the dough rise for 60 minutes.
  • Fill a small ovenproof pot with water and place it on the oven rack at the back of the oven.
  • Turn the oven to 475F and preheat.
  • Brush the cocoa snails with the whisked egg white and place the cookie sheets in the oven.
  • Let the snails bake for 4 minutes.
  • After 4 minutes turn the heat down to 375F and bake until golden brown.
  • Cocoa snails are best on the 1st day, but still enjoyable the following day.


  • LAMINATED YEAST PASTRY - BLUNDELL TÉSZTA

    Don’t be intimidated to make this marvelous pastry. It is not as difficult as it looks. A lot of goodies come from using this type of pastry. Hungarian coffee houses use it for making cocoa snails, túrós táska, tiroli rétes and various croissants. 

    Blundell tészta is a laminated/yeast raised dough. It is less work and requires less butter than puff pastry. We us two folding methods; the simplefold and the bookfold. Both methods start by rolling the dough into a rectangle and enclosing a pad of butter over part of the dough. Then you keep folding and chilling the dough forming layers of dough and butter. The simplefold method results in thinner layers. The bookfold method requires less handling, however the layers will be thicker. Recipes will tell you to rotate the dough 90 degrees before each folding. But the only thing you need to remember is to always roll the dough before folding toward the long sides of the rectangle. It is the same as turning the dough 90 degrees. 


    For the simplefold method, you roll the dough into a rectangle. 
    Divide into three parts and then fold the outer thirds of the dough 
    on top of each other over the center section.


    simplefold

    For the bookfold method, bring the outer edges of the dough together, 
    but offset them slightly to one side of the center of the dough. 
    Offsetting ensures all parts of the dough get laminated. Then fold the dough in half again.

     bookfold  step 1 and step 2
                                                                                

    Always roll the dough toward the long ends of the rectangle. 

    LAMINATED YEAST PASTRY 
    3-1/3 cups flour
    1 cup unsalted butter at room temperature
    1/4 cup sugar
    2 tsp instant yeast
    1 egg yolk
    1 tsp salt
    1 cup lukewarm milk
    flour for dusting

    • Dice a cup of chilled unsalted butter and let it sit for 15 minutes.
    • Measure out 3-1/3 cups of flour into a mixing bowl.
    • Make the butter pad next. Take 3/4 cup of flour from the flour you just measured out and combine it with the diced butter. Use your hands for this, do not whip or kneed this mixture.
    • Take from the butter mixture a glob about the size of an egg and add it to the remaining flour in the mixing bowl.   
    • Now take a sheet of plastic wrap and scoop the remaining butter mixture onto it. Spread it into a rectangle and wrap it up.
    • Put the butter pad in the freezer to solidify. While the butter pad chills in the freezer, mix up the yeast dough.
    • Add the sugar, yeast, egg yolk and salt to the mixing bowl.
    • Slightly heat up the milk and add it to the mixing bowl.
    • Stir to combine and then beat it for several minutes to form a very elastic dough. Very.
    • Form the dough into a round ball and place on a well floured cutting board.
    • Cut an X in the top and cover it with a clean kitchen cloth.
    • Let the dough rest for 20 minutes.
    • In the meantime, move the butter pad to the fridge. If the butter pad is frozen solid, you will have a hard time rolling the dough and incorporating the butter.
    • After 20 minutes of rest, start rolling out the dough toward the four corners. As you roll the dough, leave the center a little thicker.
    • Place the chilled butter pad in the middle and bundle it up from the four corners.
    • Flour the board and start rolling the dough aiming toward the four corners and it shape it into a rectangle.
    • Do a singlefold. Lengthwise divide the rectangle into three equal sections. Dividing the dough means making a mental mark or perhaps making a small nick into the dough, but don’t cut it or score it.
    • Fold the two outer parts onto the middle section. You now have three layers on top of one another.
    • Roll it out toward the long sides of the rectangle.
    • Next do a bookfold. Lengthwise divide the dough into four equal sections. Bring the outer edges of the dough together, but offset them slightly to one side of the center of the dough. Offsetting the seam ensures all parts of the dough will be laminated. Then fold the dough in half again.
    • Wrap the dough in plastic and place in the fridge for 20 minutes.
    • Take out the dough and roll it out toward the long side of the rectangle.
    • Do another singlefold. Wrap the dough and rest it for 20 more minutes.
    • After the dough has rested, it will be ready for shaping.
    16.4.16

    MARMALADE TEA CAKE

    “Teatime in London” says he. We sit in our Kamloops living room over a cup of black tea and discuss the latest in politics, scientific research, and ethics. Sometimes we talk about the children. A slice of something would be nice, perhaps a slice of marmalade cake? For me the term ‘coffee cake’ evokes espresso, nuts, buttercream and dark chocolate; the type of cakes served in coffee houses across the EU. Grab the cookie tin dear and look what is waiting for us. In year 49 we are well established in our habits.

    Found the recipe on line, but since it no longer resembles the original... Hint. Marmalade is jam. Jam is sweet. There is no need for 1.5 cups of sugar, brown sugar streusel and sugar glaze. Also there is too much liquid. Thanks for the inspiration, but I had to reinvent the recipe. The crumb turns out nice, the flavour is divine and the icing sugar on top is only for looks. Don’t inhale it darling, the powdered sugar will make you cough.  

    MARMALADE TEA CAKE
    3/4 cup soft butter
    1/2 cup sugar
    4 eggs
    1 tsp vanilla
    2-3/4 cups flour
    1 tsp salt
    1 tsp baking soda
    1/2 tsp baking powder
    1 cup buttermilk
    1 cup marmalade
    icing sugar for sprinkling

    • Fully line a 9X13 inch cake pan with parchment paper.
    • Cream the butter and sugar until fluffy.
    • Add the eggs, one at a time, beating after each addition.
    • Add the vanilla and stir.
    • Add all the dry ingredients to a medium mixing bowl and whisk it all up.
    • Add the dry ingredients alternating with the buttermilk to form a batter.
    • Fold in the marmalade.
    • Pour the batter into the prepared pan.
    • Place in the oven and bake for 25 to 30 minutes or until the cake springs back.
    • Remove from the oven and let the cake cool until at least lukewarm.
    • If chilled, the cake will slice neatly.
    • Sprinkle with icing sugar on the top and serve at room temperature.

    13.4.16

    PORRIDGE BREAD

    This is the other egg bread experiment. These were made from leftover oatmeal porridge and the 0% plain yoghurt I had courtesy of our friend, Tony. As a rule I think 0% of anything is zero, but you don’t look a gift horse in the mouth. Olivia asked me the other day what that meant and then last night we had a chat with a couple of young people about how you can’t really use a second language studying grammar only. They were from Russia and the Ukraine. Both funny and wonderful how Canada brings people together.

    They turned out less chewy than artisan breads. When I took them out of the oven they were soft and squishy. But once they cooled down, they sliced beautifully. You can’t see the oatmeal or taste it. 

    PORRIDGE BREAD
    2 eggs
    1 Tbsp sugar
    3 tsp instant yeast
    1 tsp white wine vinegar
    1 tsp salt
    3-1/2 cups flour
    1 cup thick cooked oatmeal porridge, chilled [without brown sugar or cream]
    1-1/2 cups 0% yoghurt
    flour for handling
    oil for greasing

    • In the bowl of your stand mixer, place all the ingredients.
    • With the flat beater on low speed beat and fully incorporate the dough. The dough will be wet and sticky.
    • Switch to a dough hook and beat the dough vigorously for 5 minutes or until the sides of the bowl is cleared. You can knead the dough by hand on a floured surface, but this is a sticky-dough and any additional flour will result in a denser loaf.
    • Place the dough in a lightly oiled bowl, turn over and let it rise until it doubles in size. Time can vary.
    • Line a baking sheet with parchment paper. 
    • Roll out the dough on a really well floured surface to fit your baking pan.
    • Divide the dough and roll up or twist them into two loaves.
    • Sprinkle the top with flour.
    • Place the loaves on the prepared baking sheet. 
    • Allow breads to rest for about 20 minutes in a warm, draft-free place. It will rise a bit but not considerably.
    • Turn the oven to 500F. Set the timer for 9 minutes.
    • Place the breads in the preheated oven. Set the timer for 5 minutes.
    • After 5 minutes, reduce the oven to 400F. Set the timer for 9 more minutes.
    • Remove the breads from the oven and place them on a wire rack to cool down completely before slicing.

    RAISIN EGG BREAD

    I was playing with the egg bread again. Yesterday I invented two new recipes. This one is a sweet version with raisins. In retrospect, I wished I would have put more raisins in it and the recipe reflects this desire. We love bread and the odd time we run out and buy a loaf, we never finish it and invariably gets turned into fine breadcrumbs. But then I use lots of breadcrumbs so it doesn’t go to waste. If I wasn’t a bread-maker, I think I could be convinced to go off of bread altogether. Sometimes the thought terrifies me not being well enough to cook my own food and having to move into an old folk’s home and being force-fed with store bought bread. They will have to make me to eat the stuff.   

    RAISIN EGG BREAD
    2 eggs
    1/4 cup sugar
    3/4 cup lukewarm water
    1/2 tsp vinegar
    1-1/4 cups flour
    1-1/4 cups bread flour
    2 tsp instant yeast
    3/4 tsp salt
    2 cups raisins
    white all purpose flour for handling
    • In the bowl of your stand mixer, place all the ingredients. 
    • With the flat beater on low speed beat and fully incorporate the dough. 
    • The dough will be wet and sticky. 
    • Switch to a dough hook and beat the dough vigorously for 5 minutes or until the sides of the bowl is cleared. 
    • You can knead the dough by hand on a floured surface, but this is a sticky-dough and additional flour will result in a denser loaf. 
    • Place the dough in a lightly oiled bowl, turn it over and cover with plastic wrap. 
    • Let it rise until it doubles. Time can vary. 
    • Line a baking sheet with parchment paper. 
    • Roll out the dough on a floured surface to a rectangle to fit your baking sheet. 
    • Scatter the raisins on top from end to end. 
    • Roll it up and cut in half. 
    • Turn the cut end slightly under to cover any raisins sticking out. 
    • Place the two loaves on the prepared baking sheet. 
    • Brush the tops with melted butter. 
    • Allow the bread to rest for about 20 minutes, but no longer in a warm, draft-free place. It will rise a bit but not a whole lot. 
    • Turn the oven to 500F and set the timer for 9 minutes. This time may be different for you. This is how long it takes my oven to reach the required temperature.
    • To avoid over rising, as soon as the oven reaches 500F place in the breads. Set the timer for 5 minutes. 
    • After 5 minutes, reduce the oven to 400F. Set the timer for 9 more minutes. 
    • Remove the breads from the oven and place them on a wire rack to cool before slicing.

    11.4.16

    BREADING and FRYING CUTLETS

    Breading meat, fish and vegetables is part of many cuisines. With the emergence of fast food chicken fingers, the different ways of breading exploded, making it confusing for someone who never saw a parent or grandparent bread cutlets. Asian and British breading calls for some type of batter, Hungarians use the dipping method. Dipping does not require deep-frying, the breading is comparatively more delicate and yet stable, as it does not slip off the meat. It also tastes better, but I am biased. Talking to my friend who tried to make my breaded pork cutlets made me think there might be more to successful breading than a recipe. This should demystify Hungarian breading for anyone. 

    BREADING and FRYING CUTLETS

    • Instruction for cutlet preparation is here.
    • Once the cutlets are ready for breading, set out 3 medium size bowls or pasta plates.
    • Place half a cup of flour into the first, two or more eggs into the second, and fine white breadcrumbs into the third bowl.
    • Whisk the eggs with a fork for 2 minutes; this will truly combine the yolks with the whites.
    • Set out a tray for the breaded cutlets.
    • Dip one cutlet into flour, coating it completely.
    • Next, dip the floured cutlet into the beaten eggs coating it with the eggs completely.
    • Last, dip the cutlet into the fine breadcrumbs coating it completely.
    • Transfer the cutlet to the tray.
    • Once the tray fills up, cover the first row of cutlets with plastic wrap or wax paper and place the rest of the cutlets on top. This will ensure the breading will not stick together. 
    • Cover and refrigerate the cutlets if you are not frying right of way. If I have a larger batch, I bread the cutlets in the morning and fry them up just before serving. Do not freeze or keep un-fried breaded cutlets in the fridge overnight. Long chilling will alter both the flavour and the texture of cutlets.
    • I use a large heavy pot for frying. This type of frying requires only an inch of oil in the pot.
    • Heating the oil too fast will damage the oil and burn the first cutlets. On the other hand, cutlets fried in less than optimum heat will be oil clogged. Heat up the oil on high medium. Once the oil starts to bubble, slide 2-3 cutlets into the oil. Do not crowd the pan.
    • Once the cutlets are merrily frying, turn the heat down to medium. You may have to turn it up a notch or turn it down again, but try to maintain a steady temperature.
    • Transfer the fried cutlets onto a clean paper towel lined tray.
    • Sprinkle with salt on one side. I never salt the cutlet before breading or add salt to the egg dip. With pre-salting, the leftovers will be too salty by the following day and cold breaded cutlets are fabulous!


    Oil Facts:
    The smoke point is the temperature at which oil breaks down and begins to smoke. Extra light olive oil has a high smoke point at 468F, but is usually more expensive. Cheap canola oil stinks something awful when used for frying. Extra virgin olive oil is not at all suitable for frying.

    Frying in old oil is very unhealthy. Besides cutlets will not be nice if you fry them in tired oil. If the frying oil is well strained and wasn’t overheated, it is safe to use it a second time. However, do not use it for any other purpose than frying. You can tell if the frying oil is tired. If you detect smoke from it, discard it and start with a fresh pot and fresh oil.

    Leftover Egg Dip:
    Sometimes I end up with leftover egg dip. I stir a tablespoon of flour into it and fry it up when the cutlets are finished. As a kid, I always looked forward to getting “the egg” with my cutlet.


    Leftover Flour and Breadcrumbs:
    You can save leftover flour and breadcrumbs in the freezer. Never put used flour or breadcrumbs back into the bin or you run the risk of botulism.

    Privacy & Cookies

    This site uses cookies. By continuing to use this website, you agree to their use. To find out more, including how to control cookies, see here: Cookie Policy

    Translate

    me

    My photo
    It began with posting a few recipes on line for the family. "zsuzsa is in the kitchen" has more than 1000 Hungarian and International recipes. What started out as a private project turned into a well visited blog. The number of visitors long passed the two million mark. I organized the recipes into an on-line cookbook. On top of the page click on "ZSUZSA'S COOKBOOK". From there click on any of the chapters to access the recipes. For the archive just scroll to the bottom of the page. I am not profiting from my blog, so visitors are not harassed with advertising or flashy gadgets. The recipes are not broken up with photos at every step. Where needed the photos are placed following the recipe. Feel free to cut and paste my recipes for your own use. Publication is permitted as long as it is in your own words and with your own photographs. However, I would ask you for an acknowledgement and link-back to my blog. Happy cooking!