30.6.12

DRYING CHERRIES IN THE OVEN

The migratory birds ate most of it; still they left about a hundred pounds of cherries on the tree. So now, it’s time to pick, eat, give away and preserve. The cherries are lovely; no wonder the birds had a feast a couple of weeks ago. Jim was out there clapping and rattling stuff, but nothing would deter the invasion. I was laughing at the window, undeterred in the knowledge that I will have plenty of work left even if the birds gorge themselves on half the tree. 
and sure enough...

If sulphured, dry cherries hold their color and last longer, but I don’t make more than what we can eat within a year, besides I would rather not use sulphur. Consequently, my cherries look darker and their flavour resembles raisins more than cherries. However, they are excellent in a trail mix, homemade granola and in various baked goods.

DRYING CHERRIES IN THE OVEN
• Select ripe blemish free cherries.
• Wash well in cold water and remove the stems.
• Remove the pits with a cherry pitter or cut each cherry in half removing the pit.
• Line a baking sheet with parchment paper.
• Arrange the pieces cut side up and set in oven at 160F until the tops look leathery.
• Reduce heat to 130F until done.
• If not ready, turn off heat and leave the cherries in the oven for the night. Resume the drying next morning, but watch it, because the cherries will dry quickly from that point on. Mine was finished within the first hour.
• The cherries will be still soft to the touch, but will harden up rather quickly.
• Transfer the cherries to a freshly lined tray immediately. Do not leave them on the original paper for any length of time, because they will stick to the parchment as they cool.
• The cherries should be hard and yet pliable, a little sticky and leathery. Squeezing them should produce no liquid.
• Let the cherries air dry and pack them into sterilized jars with well fitting lids.

22.6.12

PINEAPPLE SQUARES

I saw these truly grandmother squares on add a pinch.com. They are simple, substantial and deliciously satisfying. Not one of those scanty efforts you can barely cover the pan with. This one is a keeper. I sliced the squares while hot; I didn't think it would make much of a difference to wait for it to cool. In retrospect, the recipe was correct; these do slice neatly if allowed to cool first. 

PINEAPPLE SQUARES
Crust:
1 cup butter, softened
2 cups all-purpose flour
1/2 cup confectioner’s sugar
Filling:
4 eggs
1 cup granulated sugar
1 18 oz can pineapple tidbits (with juice)
1 cup all-purpose flour
1/2 tsp baking powder
1/2 tsp cornstarch
1/4 cup icing sugar for sprinkling

• Preheat oven to 350F.
• Mix together butter, flour, and confectioner’s sugar.
• Press into the bottom of a 9×13-inch baking-pan.
• Bake for approximately 20 minutes, or until lightly golden brown.
• Mix together eggs, sugar, pineapple with the juice, flour, baking powder, and cornstarch.
• Pour over the baked crust.
• Bake for 25 minutes.
• Remove from oven and dust with confectioner’s sugar.
• Allow to cool, cut into squares, and serve. 

17.6.12

NUTELLA PASTRY BRAIDS

This pastry comes from a magazine clipping via RecipeCurio.com. It is easy and delicious and lends itself to a wide variety of pastry recipes. There is no liquid in the recipe; the moisture comes entirely from the fat so there is no risk of ending up with a tough pastry. The pastry makes 2 braids. If you are not making both braids, wrap the second half of the dough and freeze it for use later.  Then thaw it in the fridge overnight before using. 

NUTELLA PASTRY BRAIDS 
Pastry:
2 cups [250g] cream cheese, at room temperature 
1 cup butter, at room temperature 
2-1/2 cups flour 
1 tsp salt 
Filling and Topping:
1 cup nutella 
1 lightly beaten egg for egg wash 

• Combine the cheese and butter in the bowl of the electric mixer and beat at medium speed until very smooth and creamy. 
• Reduce the speed to low and gradually add the flour and the salt. 
• Transfer to a board and knead on a lightly floured board only until the mixture clings together. 
• Wrap in plastic wrap and refrigerate overnight. Do not omit this step.
• The following day remove chilled dough from the fridge and let it stand at room temperature for 30 minutes before rolling. 
• Preheat the oven to 400 degrees F. 
• Line a baking sheet with parchment paper. 
• Divide the chilled dough into two parts. 
• Roll each half into a long rectangle. 
• Spread 1/2 cup of nutella down the length of the center of each rectangle. 
• Cut the sides into 1 inch strips along both sides. 
• Fold the strips over diagonally to make a braid. 
• Tuck the ends under. 
• Place the braid on the prepared baking sheet. 
• Repeat the previous steps and make the second braid. 
• Remove chilled dough from the fridge and let stand at room temperature for 30 minutes before rolling. 
• Shape it as desired and fill it with your choice of filling. 
• Spread the top with egg wash and bake in preheated 400F oven until golden brown.


16.6.12

FRUITY WHITE CHOCOLATE COOKIES

I use the same cookie batter for my chocolate chip, crazy and raisin cookies. Always use softened butter; it beats up fluffier than cold butter. When shaping the cookies, do not press the dough together, form a loose ball and never press them down. Then you will always have crispy cookies with a soft interior. For this same reason, don’t make the cookies too small. One batch should yield about fifteen, maximum twenty cookies, depending on the amount of chocolate, dry fruit or nuts you added to the batter.

FRUITY WHITE CHOCOLATE COOKIES
1/2 cup butter, softened
1/2 cup sugar
1/4 cup light brown sugar
1 tsp vanilla
1 egg
1-1/2 cups flour
1/2 tsp soda [no more]
1/2 tsp salt
3/4 cup dried cranberries
1 cup dried mangoes, chopped
1 cup good quality white chocolate chips

• In a large bowl beat the butter, sugars, vanilla and egg light and fluffy.
• In a separate bowl sift together the flour, soda and salt.
• Add the flour mixture to the butter mixture and combine.
• Stir in the dried fruits and the white chocolate chips.
• Drop 2 inches apart with heaping tablespoon, on parchment lined baking sheets.
• Bake at 350F for 12 to 15 minutes until lightly browned.
• Allow cookies to solidify before moving them to a wire rack.
• Makes 20

12.6.12

GREEN PEAR SALAD

Guaranteed this will be the first to go on the buffet table. And the dressing… ah the dressing is heavenly! If you have a good salad garden, this will be a joy to prepare. My greens are still small so I bought a large package of prewashed greens at Safeway. Make sure the packed greens are very, very fresh. I washed them anyway... the water brings the leaves alive and your salad will be fresher that way. As for the green pear, I would not use soft, fully ripened pear. It should be firm, because you want the pear sliced very thin. I used only one pear, but I think the salad could use up to two pears. 

My daughter said this would have been nice with goat cheese too. [smart daughter eh?] But I opted to go without, because I made a couple of other salads with feta cheese, and it would have been just too many salads with cheese. I also rather liked the lightness of this salad without cheese.

Words of caution, when you make the dressing, use a blender*, not a food processor. What a mess it made for me! If you don’t have a blender, prepare it by hand**. 

GREEN PEAR SALAD
Salad:
3 large handfuls of mixed greens
1 green pear thinly sliced
3/4 cup pecans, lightly toasted
3/4 cup dried cranberries
Dressing:
2 very finely chopped shallots
1/4 cup sugar
1/2 cup white vinegar
1/2 teaspoon salt
1 tsp Dijon mustard
1/2 cup vegetable oil

• On medium heat, lightly toast the pecans in a non-stick skillet.
• Remove and set aside to cool.
• Wash and spin-dry the salad greens.
• Place the salad greens in a large mixing bowl.
• Wash and thinly slice the pear. [Do not peel]
• Place the sliced pear in a bowl and toss with 1 heaping Tbsp of Fruit Fresh. This will keep the pear from oxidizing.
• Add the pear slices to the bowl.
• Add the toasted pecans and the dried cranberries to the bowl.
• Lightly toss and transfer to a salad bowl.

*Dressing in Blender:
 Place dressing ingredients [except the oil] in a blender and blend.
• In a thin, steady stream, add the oil.
• Transfer to a decanter and serve with the salad.

**Dressing by Hand:
• Alternatively, dice or grate the shallots and set them aside.
• With a balloon whisk, combine the rest of the dressing ingredients [except the oil].
• In a thin, steady stream, whisk in the oil
• Add the shallots and whisk to combine.
• Transfer to a decanter and serve with the salad.
 

LENTIL FETA SALAD


Adapted to from the salad on Just Easy Recipes and I have to agree this salad is easy and simple. I cooked my own lentils, they were done by the time I chopped up the vegetables and whisked up the dressing. I rinsed them under cold running water and promptly assembled the salad. I changed some of the amounts, but otherwise, I followed the recipe faithfully. I made it for a family gathering and it was a hit.

My grocery store  carries a small Italian/Greek cheese section by the deli counter. That is where I buy my Saputo brand feta in 1 kg packages. It is a very creamy, mildly salty feta and is ready for use. I keep it in the freezer to retain the freshness. It costs $16.00, but just think how little feta you are getting in those tiny packages or tubs for five dollars and up someplace else. And these feta buys are not only expensive. They are also very salty, so salty that you have to soak them in water for a day. They are also hard or are mixed and flavoured with herbs and oil. Try to find a mildly salty, creamy feta in an Italian deli if you don’t have access to a creamy feta at your supermarket.

LENTIL FETA SALAD
Salad:
1/2 cup of green lentils, cooked and rinsed
1 yellow pepper, sliced into cubes
1 green pepper, sliced into cubes
1 tomato, sliced into cubes
1/2 red onion, sliced into cubes
1 cup of creamy feta cheese [Saputo]
1/2 cup chopped coriander
Dressing:
1/2 cup olive oil
1/2 cup apple cider vinegar
2 tsp mixed herbs

• Place the lentils in 1-1/2 cups of water and cook until soft.
• Meanwhile wash the vegetables and dice them into large cubes.
• Place the vegetables in a large bowl and set aside.
• Make the salad dressing and set aside.
• Combine dressing ingredients in a measuring cup.
• Whisk together with a small balloon whisk until mixture emulsifies.
• Set the dressing aside.
• Drain the cooked lentils.
• Rinse them under cold running water and drain again.
• Add the lentils to the chopped vegetables.
• Add the feta cheese.
• Toss lightly and transfer mixture into a salad bowl.
• Transfer the dressing [via funnel] into a decanter and serve it alongside the salad.

11.6.12

SALAD TRAY WITH FETA

Prepare this tray in advance and serve the salad dressing separately. That way the leftovers can be repacked and enjoyed on the following day. The list of ingredients is flexible in order to suit preference and availability. The shape of the tray does not matter. What matters that it has a rim, to prevent the vegetables from sliding off the tray.

SALAD TRAY WITH FETA
1 head of butter lettuce
1/2 head of radicchio
1 Belgian endive
1 yellow pepper
1 red pepper
2 ripe tomatoes
4 radishes
1/2 English cucumber
1 bunch sweet pea shoots
1 cup crumbled Greek feta cheese
parsley, for garnish

• Separate the lettuce leaves. Wash under running water and set to drain.
• Separate the radicchio and the endive leaves. Wash under running water and set to drain.
• Wash the peppers, tomatoes, radishes, English cucumber and the sweet pea shoots. Set to drain.
• Chop the yellow and red peppers, tomatoes, radishes and dice the English cucumbers.
• Arrange all the prepared vegetables in groups and add the feta cheese.
• Garnish with parsley.
• Garnish with homemade balsamic vinegar dressing.

CAKE BLONDIES


Not all blondies are created equal. Some are dry and many are overly sweet. Now these are lovely! There is no need for icing and it is a pleasure to cut. I sliced these while still hot.

CAKE BLONDIES
2/3 cup butter
1-1/3 cup yellow sugar
1 tsp pure vanilla extract
3 eggs
1-2/3 cups flour
1 tsp baking powder
1/4 tsp salt

• Preheat the oven to 350F.
• Lightly spray an 8 x 8-inch baking pan with cooking spray.
• Fully line the pan with parchment paper with some overhang on two sides.
• Melt the butter and add the yellow sugar.
• Whisk to combine. Make sure there are no sugar lumps.
• Add the vanilla and the eggs.
• Whisk to combine.
• Add the flour, baking powder and the salt.
• Stir to combine.
• Beat on high speed for a couple of minutes.
• Pour batter into the prepared pan.
• Stir until combined again. Beat for two minutes.
• Bake until a cake tester comes out clean and the top is lightly domed. Grab the two overhangs; the cake should easily slide out of the pan. Cut into squares.
  

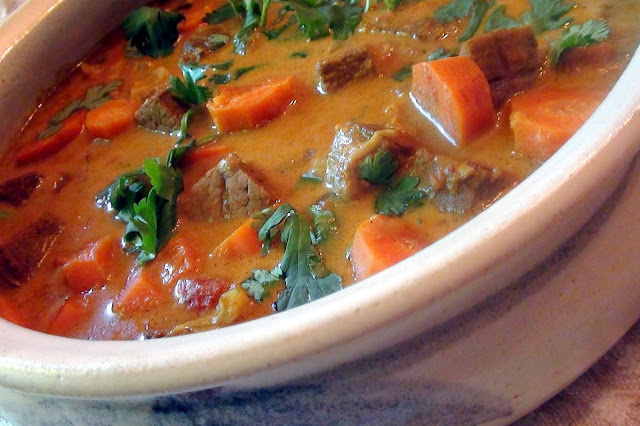
BEEF CURRY


The color could have been fiercer, because all I could find in the freezer was Madras curry powder for chicken. This curry has the mildest of spiciness, not hot, but it is not bland either. If you like heat, throw in some green chilies.

I don’t make my own curry powder, there is an East Indian market nearby and I get my supplies there. They make their own curry powders and are always fresh. I keep the curry powders in plastic containers in the freezer, just like my Hungarian paprika. If you have no access to authentic curry mixtures, make your own, because no good curry powder comes in a tin, a bottle or a packet from a large supermarket.

BEEF CURRY
4 Tbsp peanut oil
500g round steak
1 cup water
1 onion, diced
4 garlic cloves, crushed
1 Tbsp grated ginger
2-1/2 Tbsp curry powder
2 tsp sugar
2 tsp turmeric
1 cup tomatoes, diced
2 carrots, sliced
1 cup canned coconut milk
handful of chopped coriander leaves to serve with

• Trim the round steak and chop into cubes.
• Place 2 Tbsp peanut oil in a large non-stick skillet.
• Add the meat and brown, turning until no pink is showing.
• Add 1 cup of water and slowly sauté the meat until tender. Add more water if needed.
• When the meat is tender, transfer to a dish and set it aside.
• Add the remaining peanut oil to the skillet and add the onions.
• Sauté the onions until they are soft.
• Stir in the crushed garlic, grated ginger, curry powder, turmeric and the sugar.
• Cook for two minutes.
• Return the beef to the skillet.
• Add the carrots and cook stirring for one minute, to coat in spices.
• Add the crushed tomatoes and the coconut milk.
• Bring the curry to a simmer.
• Cover and simmer for fifteen minutes.
• Remove from heat and let the curry rest for ten more minutes.
• Top with chopped coriander leaves.
• Serve with rice.
 

6.6.12

HAWAIIAN PORK CHOPS

Under gloomy skies with a walnut tree in the back and a maple in the front of my house, it is almost impossible to take a good photo of our meal by five. I may have to start taking the plate outside or simply give it up on gloomy days. Much of the meals I cooked during the winter did not end up on the blog because it was too dark to take a descent photo. Once again it is promising to be a wet June, looks as if I will have more challenges besides the cooking. I am afraid the photo does not really do justice to this lovely dish, but it will have to do for now.

This is very quick to prepare and with few ingredients. If the pork chops are pounded thin, salted, and then placed in the fridge for the night the dinner can be ready in record time. One alternative is to sauté the chops in a little bit of stock. Just make sure the stock is reduced to almost nothing before adding the rest of the ingredients. Eat it with rice or without. This makes two very large servings, but with rice, it will easily feed four people. This dish has a hint of sweet and sour flavour, but I would not call it a sweet and sour dish either. Serve it promptly. Best is to prepare this just before serving. It will taste the same, but the vegetables will soften if they sit around or if the dish has to be reheated. So eat it while fresh.

HAWAIIAN PORK CHOPS
4 thin, boneless pork chops
3 Tbsp olive oil
1 medium onion, chopped
1 read pepper, chopped
1 small zucchini, chopped
1 Tbsp finely grated ginger [not ground ginger]
1 can of unsweetened pineapple chunks, fruit and juice used separately
1-1/2 tsp cornstarch

• Cut each tenderized pork chop into 3-4 chunks.
• Place 3 Tbsp olive oil in a large non-stick skillet.
• Add the chops and cook, turning them over until meat is no longer red. Do not brown the meat. If the pork is tough, add some stock or water and sauté until tender. Simmer until all the stock is reduced, but do not brown.
• Add the chopped onions. Sauté the onions while you prepare the red pepper.
• Wash and chop the red pepper and add to the skillet.
• Continue to sauté, meanwhile grate the ginger and wash and slice the zucchini.
• Add these to the skillet. Continue to sauté.
• Open up the can of pineapple and drain the juice, reserving the juice for use later.
• Add the drained pineapple and continue to sauté.
• Combine reserved pineapple juice with the cornstarch pour it over the contents of the skillet through a fine sieve. [You don’t want chunks or cornstarch floating in the sauce.]
• Season the dish with salt and pepper to taste. [Remember, the pork chops had salt on them already.]
• Bring it to a simmer, cover and remove skillet from the heat.
• Let it rest for two minutes.
• This just gives enough time to serve the rice or warm the plates in the microwave.
• Serve it promptly.

4.6.12

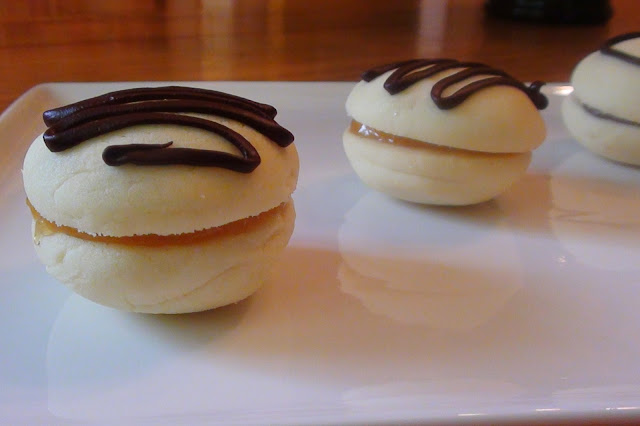
NERO COOKIES - NÉRÓ TEASÜTEMÉNY


These amazing little cookies can be found in the coffeehouses throughout Hungary. The recipe makes two dozen cookies and the first time I made them I must have polished off half… So beware. But I will have you know I was good today, I only ate one. Still it will not last long, I filled a dozen with nutella for the grandchild, the rest I assembled as they should be, with apricot jam. Quality ingredients are important. Use butter and icing sugar and whip them up very, very fluffy. Resist the urge to add more flour even though it will look like it just begs for more flour.  Also the apricot jam cannot be runny or the cookies will look like a mess. The best is to use pure baking chocolate, [Ghirardelli, Bakers or Callebaut], the one thing about that you will have to give time for the chocolate squiggles to solidify on the top. This goes faster with pure chocolate chips, but the piping is not as fine as with block chocolates. Do not omit the lemon rinds or the salt; everything works together here for a perfect little cookie.

NERO COOKIES
1/2+1/3 cup butter, soft
1 cup icing sugar
4 egg yolks
2 cups flour
rind of 1 lemon, very finely grated
1 pinch of salt
1 tsp pure vanilla
apricot jam for spreading [make sure the jam is not runny]
1 square of pure baking chocolate*
1 Tbsp butter

• Preheat oven to 350F.
• Beat the soft butter and the icing sugar until very fluffy.
• Add the egg yolks and beat some more.
• Gradually add the flour, grated lemon rind, salt and the vanilla.
• Combine to form the cookie dough. Resist the urge to add more flour.
• Line a baking sheet with parchment paper.
• Roll the dough into 48 balls. Every so often, I flour my hands so the cookie dough won’t stick to my hands. Traditionally these cookies are piped, but I find it faster to just roll them. If you prefer to pipe the cookie dough, form the cookies into ball shapes.
• Place the little balls on the prepared baking sheet leaving some space in between. Do NOT flatten the cookie balls.
• Place in the preheated oven and bake for 12-14 minutes. Do not over bake.
• Remove cookies from the oven and let them solidify before transferring to a wire rack.
• Spread about 1 tsp of apricot jam [or nutella] on a cookie. Do not spread the filling all the way to the edge, because it will overflow and the cookies will be a mess. Place a cookie on the top and set aside. Fill the rest of the cookies.
• Melt the chocolate and butter in the top of a double boiler.
• Place a heavy zyploc bag inside a coffee mug and spoon the melted chocolate into the bag.
• Close the zyploc and cut a tiny hole into one of the corners of the bag.
• Twist the bag and squeeze squiggles on the top of the filled cookies.

*1 square =1 oz = 1/3 cup chocolate chips

3.6.12

CHEESY PASTA WITH BROCCOLI AND HAM

I make several variations of cheesy pasta; this is probably the fastest and the most favored. You can use regular or marble cheddar, but the dish will look and taste a little different. 

CHEESY PASTA WITH BROCCOLI AND HAM
1/2 batch of wide cooked home made pasta
[alternatively you can use 10 fresh lasagna noodles or 3 fresh lasagna sheets]
1 Tbsp olive oil
1 head of broccoli, cut into bite-size florets
1-1/2 cups milk
1 cup light cream cheese
1/2 + 1/4 cup white cheddar cheese, shredded
salt and pepper to taste
1 cup ham cubes
1/4 cup breadcrumbs

• If using homemade pasta, make 1/2 batch of the noodle recipe first.
• Cut the noodles one inch wide. [Homemade noddles will increase in size when cooked.]
• Meanwhile preheat the oven to 350F.
• Bring a large pot of salted water to boil.
• Cook the pasta until pleasantly soft, but do not overcook.
• Drain the pasta and place it in a large mixing bowl.
• Add 1 Tbsp olive oil and toss to coat. Set the pasta aside.
• Blanche the broccoli florets until they are dark green in color.
• Drain broccolis and set them aside.
• In a medium sized pot, bring the milk to the boil.
• While the milk heats up, place the cream cheese in a medium sized bowl.
• Gradually whisk some of the hot milk into the cream cheese to incorporate.
• Transfer cheese mixture back to the pot.
• Add 1/2 cup of the shredded white cheddar, whisking all the while.
• Bring the cheese sauce to a slow simmer and cook until slightly thickened.
• Add salt and pepper to taste.
• Pour the cheese sauce over the pasta and toss to coat.
• Add the cubed ham and toss.
• Add the broccoli florets and toss it into the pasta very gently.
• Spray an ovenproof dish with cooking spray.
• Transfer the pasta mixture to the prepared dish.
• Sprinkle the top with the remaining 1/4 cup white cheddar cheese and the breadcrumbs.
• Bake in a preheated oven until the cheese melts and the pasta and breadcrumbs are lightly toasted.
• Remove from the oven, cover and let it rest for 10 minutes before serving.
• This is even better if reheated next day.

2.6.12

COCONUT CREAM WITH CANNED PEACHES

First saw it on With a Glass, this is a refreshing bowl of sweet delight! The preparation is minimal, just chill the bowls in the fridge. I used light coconut milk, a jar of my own peaches and replaced the agar agar with cornstarch. I am planning to make it again tomorrow with the leftover coconut milk, this might be the start of a new obsession... sooooo yummy!

COCONUT CREAM WITH CANNED PEACHES
1 cup light coconut milk
1 cup milk
4 Tbsp sugar
1 tsp cornstarch
1 can of sliced peaches

• Dissolve the sugar and cornstarch in the mixture of the two milks.
• Bring to boil and, constantly stirring, let it simmer for about a minute.
• Put aside.
• Prepare four individual bowls or low glasses.
• Distribute the peaches into the bowls.
• Pour the coconut milk mixture into the bowls and refrigerate for at least two hours.
• Serve very cold.
  Yields 4 servings

CUTLET IN A BUN - RÁNTOTT HÚSOS ZSEMLE

Long before hamburger stands showed up on the streets of Budapest, this was the #1 choice. I cannot think of a better meal on the run or a more desirable item at a picnic. The recipe is a substantial sized crusty type bun cut in half and a breaded cutlet slapped inside it. It can be a hot or a cold cutlet. No hamburger can ever come close to its deliciousness.

CUTLET IN A BUN
1 boneless breaded cutlet, freshly fried or cold
1 substantial crusty type bun, Portuguese, Keiser, etc

• Prepare the breaded cutlet.
• Cut the bun in half.
• Place the breaded cutlet inside.

OLD FASHIONED SWEET ROLLS

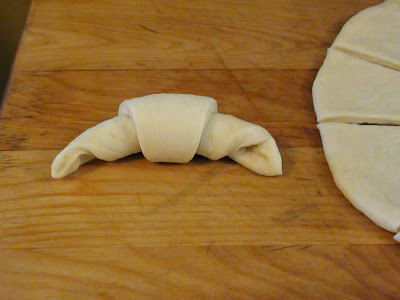
I thought I would revisit one of the oldest sweet roll recipes from my more than forty years old Better Homes and Gardens Cookbook. This recipe was one of those on and off successes that often failed to work for me. I replaced the active dry yeast with instant dry yeast, the water for proofing with milk and I used bread flour. Well wouldn’t you know, it has never been this good! A word of caution, don’t double the recipe, not unless you are planning to eat it all in one day. When a day old, these lovely little buns seem to loose their soft texture. I made 2 dozen rolls, 12 bowknots and 12 butterhorns. I glazed the bowknots. You can also make butterfans, cloverleaves corkscrews, or parker house rolls.

OLD FASHIONED SWEET ROLLS
1-1/4 cup lukewarm milk
1/4 cup sugar
1 tsp salt
2-1/2 tsp instant dry yeast
1/4 cup shortening, softened
1 egg
3-1/2 cups white bread flour
1 egg for egg wash

• Place milk, sugar, salt, yeast, shortening, egg and 1 cup of bread flour in a large bowl.
• Blend ingredients.
• Gradually add the remaining bread flour to form soft dough.
• Kneed with dough hook for four minutes or by hand for ten.
• Place in a buttered bowl, turning once to grease surface.
• Cover an let rise until doubled.
• Turn out on lightly floured surface and shape into the desired shape.
• Let shaped rolls double and baste it with egg wash.
• Bake on parchment lined baking sheets at 400F for 12-15 minutes.
Yields two dozen rolls.
Forming the bowknots


Forming the butterhorns


1.6.12

COCONUT THALERS – KÓKUSZTALLÉR

Thalers were silver coins used throughout Europe for almost four hundred years. The name lives on in the dollar – for the time being anyway. I never know if my source would want me to identify the origin of a recipe when I tear it apart. It’s a Hungarian cooking site, so I will leave it at that. I made a batch yesterday and it was a disaster, the cookies were all over the place completely without uniformity. I was tempted to give it another name, but I thought no, this was a failure. We liked the taste, even Olivia ate it and to my knowledge, she didn’t even like coconut. So I mixed up half a batch today, ignoring some of the redundancies of the recipe and all the bad advice. Today’s cookies turned out almost perfect, I would have liked them more if they were a little larger. I had 42 cookies from half a batch so yes these are small. To get evenly shaped cookies, you must not press this cookie down, because it is not possible to maintain even pressure of fingers, which then results in all sorts of crazy shapes and some of which fuse together no matter how far you space them. So let physics happen, the cookies will spread out evenly, as long as you make a reasonable mound of batter on the baking sheet. In retrospect, I should have used a piping bag; it would have been much faster than with a spoon. I tried spraying the parchment paper with cooking spray, but I didn’t like the greasiness of the cookie bottoms. Then I discovered that if you let the cookies cool on the pan, they will not only solidify, they will separate from the paper with ease.

COCONUT THALERS
1/4 cup + 2 Tbsp butter, melted and cooled
4 egg whites
scant 1/2 cup sugar
3 Tbsp flour
1 cup fine unsweetened coconut

• Melt the butter and set it aside to cool down.
• Meanwhile line two baking sheets with parchment paper.
• Beat the egg whites until very soft peeks form.
• Gradually add the sugar, beating all the while.
• Spoon by spoon beat in the flour.
• Gradually pour in the cooled, melted butter, beating all the while.
• Gradually add the coconut and beat it until well combined.
• Set the oven to 375F.
• Using a pastry bag or a soupspoon, place a little mound of batter on the prepared baking sheet. If using a spoon, use your left finger to guide the batter, so it forms a nice round mound. Do NOT press it down. This takes time, especially if you use a spoon. By the time two baking sheets are filled, the oven should be ready.
• Place the cookie sheet in the preheated oven and bake from 10-12 minutes, until the cookies are starting to get a little color around the edge.
• Remove baking sheet from the oven and let the cookies cool down on the cookie sheet.
• Once cooled, the cookies will easily separate from the parchment paper.

Privacy & Cookies

This site uses cookies. By continuing to use this website, you agree to their use. To find out more, including how to control cookies, see here: Cookie Policy

Translate

me

My photo
It began with posting a few recipes on line for the family. "zsuzsa is in the kitchen" has more than 1000 Hungarian and International recipes. What started out as a private project turned into a well visited blog. The number of visitors long passed the two million mark. I organized the recipes into an on-line cookbook. On top of the page click on "ZSUZSA'S COOKBOOK". From there click on any of the chapters to access the recipes. For the archive just scroll to the bottom of the page. I am not profiting from my blog, so visitors are not harassed with advertising or flashy gadgets. The recipes are not broken up with photos at every step. Where needed the photos are placed following the recipe. Feel free to cut and paste my recipes for your own use. Publication is permitted as long as it is in your own words and with your own photographs. However, I would ask you for an acknowledgement and link-back to my blog. Happy cooking!